Git.md
Git
一、Git概述
1.1 Git三种状态
- 已提交(committed):Modified means that you have changed the file but have not committed it to your database yet.
- 已修改(modified):Staged means that you have marked a modified file in its current version to go into your next commit snapshot.
- 已暂存(staged):Committed means that the data is safely stored in your local database.
1.2 Git三个阶段
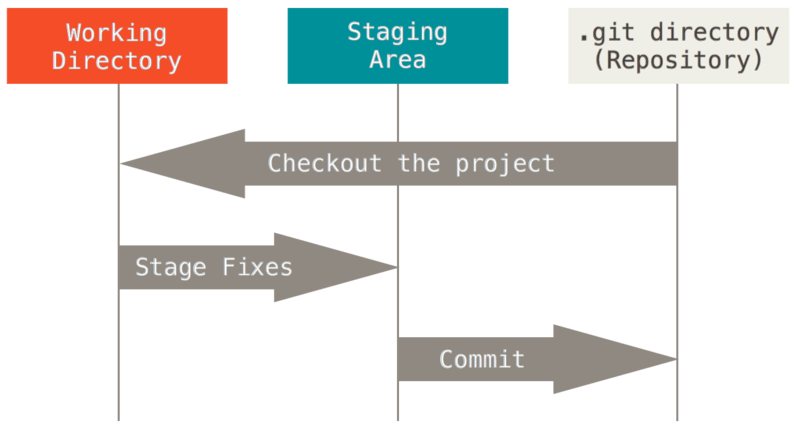
- 工作区(Working Tree):The working tree is a single checkout of one version of the project. These files are pulled out of the compressed database in the Git directory and placed on disk for you to use or modify.
- 暂存区(Staging Area / Index):The staging area is a file, generally contained in your Git directory, that stores information about what will go into your next commit. Its technical name in Git parlance is the “index”, but the phrase “staging area” works just as well.
- Git目录(Git Directory):The Git directory is where Git stores the metadata and object database for your project. This is the most important part of Git, and it is what is copied when you clone a repository from another computer.
1.3 Workflow Of Git
The basic Git workflow goes something like this:
- You modify files in your working tree.
- You selectively stage just those changes you want to be part of your next commit, which adds only those changes to the staging area.
- You do a commit, which takes the files as they are in the staging area and stores that snapshot permanently to your Git directory.
1.4 用户信息
The first thing you should do when you install Git is to set your user name and email address. This is important because every Git commit uses this information, and it’s immutably baked into the commits you start creating:
1 | |
NOTICE:You need to do this only once if you pass the
--globaloption, because then Git will always use that information for anything you do on that system. If you want to override this with a different name or email address for specific projects, you can run the command without the--globaloption when you’re in that project.
1.5 Checking Your Settings
If you want to check your configuration settings, you can use the git config --list command to list all the settings Git can find at that point:
1 | |
二、 Git Bacis
2.1 Initializing a Repository in an Existing Directory
If you have a project directory that is currently not under version control and you want to start controlling it with Git, you first need to go to that project’s directory. Then type:
1 | |
If you want to start version-controlling existing files (as opposed to an empty directory), you should probably begin tracking those files and do an initial commit. You can accomplish that with a few git add commands that specify the files you want to track, followed by a git commit:
1 | |
2.2 Recording Changes to the Repository
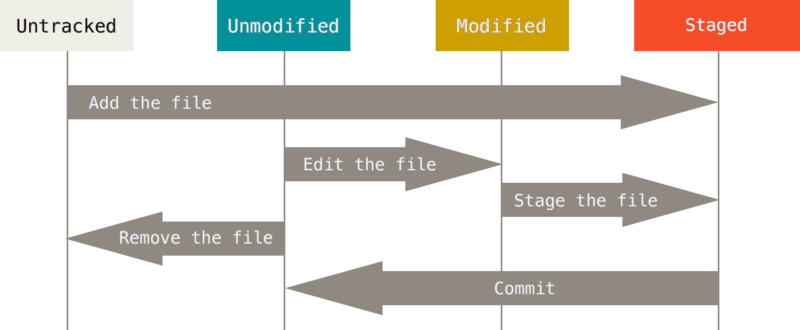
Checking the Status of Your Files
The main tool you use to determine which files are in which state is the git status command.
1 | |
The lifecycle of the status of your files
2.3 Ignoring Files
The rules for the patterns you can put in the .gitignore file are as follows:
- Blank lines or lines starting with
#are ignored. - Standard glob patterns work, and will be applied recursively throughout the entire working tree.
- You can start patterns with a forward slash (
/) to avoid recursivity. - You can end patterns with a forward slash (
/) to specify a directory. - You can negate a pattern by starting it with an exclamation point (
!).
Glob patterns are like simplified regular expressions that shells use. An asterisk (*) matches zero or more characters; [abc] matches any character inside the brackets (in this case a, b, or c); a question mark (?) matches a single character; and brackets enclosing characters separated by a hyphen ([0-9]) matches any character between them (in this case 0 through 9). You can also use two asterisks to match nested directories; a/**/z would match a/z, a/b/z, a/b/c/z, and so on.
Here is another example .gitignore file:
1 | |
2.4 Removing Files
To remove a file from Git, you have to remove it from your tracked files (more accurately, remove it from your staging area) and then commit. The git rm command does that, and also removes the file from your working directory so you don’t see it as an untracked file the next time around.
The primary function of git rm is to remove tracked files from the Git index. Additionally, git rm can be used to remove files from both the staging index and the working directory.
Another useful thing you may want to do is to keep the file in your working tree but remove it from your staging area. In other words, you may want to keep the file on your hard drive but not have Git track it anymore. This is particularly useful if you forgot to add something to your .gitignore file and accidentally staged it, like a large log file or a bunch of .a compiled files. To do this, use the --cached option:
1 | |
2.5 Viewing Your Staged and Unstaged Changes
1 | |
Show changes between the working tree and the index or a tree, changes between the index and a tree, changes between two trees, changes resulting from a merge, changes between two blob objects, or changes between two files on disk.
The following examples will be executed in a simple repo. The repo is created with the commands below:
1 | |
we execute git diff at this point, there will be no output. This is expected behavior as there are no changes in the repo to diff. Once the repo is created and we’ve added the diff_test.txt file, we can change the contents of the file to start experimenting with diff output.
1 | |
Executing this command will change the content of the diff_test.txt file. Once modified, we can view a diff and analyze the output. Now executing git diff will produce the following output:
1 | |
1 | |
The first line is the chunk header. Each chunk is prepended by a header inclosed within @@ symbols. The content of the header is a summary of changes made to the file. In our simplified example, we have -1 +1 meaning line one had changes. In a more realistic diff, you would see a header like:
1 | |
In this header example, 6 lines have been extracted starting from line number 34. Additionally, 8 lines have been added starting at line number 34.
2.6 Viewing the Commit History
After you have created several commits, or if you have cloned a repository with an existing commit history, you’ll probably want to look back to see what has happened. The most basic and powerful tool to do this is the git log command.
When you run git log in this project, you should get output that looks something like this:
1 | |
By default, with no arguments, git log lists the commits made in that repository in reverse chronological order; that is, the most recent commits show up first. As you can see, this command lists each commit with its SHA-1 checksum, the author’s name and email, the date written, and the commit message.
git logdoesn’t show all the branches all the time.By default,
git logwill only show commit history below the branch you’ve checked out.To show commit history for the desired branch you have to explicitly specify it:
git log testing. To show all of the branches, add--allto yourgit logcommand.
Common options to git log
| Option | Description |
|---|---|
-p |
Show the patch introduced with each commit. |
--stat |
Show statistics for files modified in each commit. |
--shortstat |
Display only the changed/insertions/deletions line from the –stat command. |
--name-only |
Show the list of files modified after the commit information. |
--name-status |
Show the list of files affected with added/modified/deleted information as well. |
--abbrev-commit |
Show only the first few characters of the SHA-1 checksum instead of all 40. |
--relative-date |
Display the date in a relative format (for example, “2 weeks ago”) instead of using the full date format. |
--graph |
Display an ASCII graph of the branch and merge history beside the log output. |
--pretty |
Show commits in an alternate format. Option values include oneline, short, full, fuller, and format (where you specify your own format). |
--oneline |
Shorthand for --pretty=oneline --abbrev-commit used together. |
Option --pretty
This option changes the log output to formats other than the default. A few prebuilt option values are available for you to use.
The most interesting option value is format, which allows you to specify your own log output format. This is especially useful when you’re generating output for machine parsing — because you specify the format explicitly, you know it won’t change with updates to Git:
1 | |
Useful specifiers for git log --pretty=format lists some of the more useful specifiers that format takes.
| Specifier | Description of Output |
|---|---|
%H |
Commit hash |
%h |
Abbreviated commit hash |
%T |
Tree hash |
%t |
Abbreviated tree hash |
%P |
Parent hashes |
%p |
Abbreviated parent hashes |
%an |
Author name |
%ae |
Author email |
%ad |
Author date (format respects the –date=option) |
%ar |
Author date, relative |
%cn |
Committer name |
%ce |
Committer email |
%cd |
Committer date |
%cr |
Committer date, relative |
%s |
Subject |
The format option values are particularly useful with another log option called --graph. This option adds a nice little ASCII graph showing your branch and merge history:
1 | |
Limiting Log Output
In addition to output-formatting options, git log takes a number of useful limiting options; that is, options that let you show only a subset of commits.
In fact, you can do -<n>, where n is any integer to show the last n commits, such as
1 | |
git log -2 shows the last 2 commits
2.7 Undoing Things
1 | |
This command takes your staging area and uses it for the commit. If you’ve made no changes since your last commit (for instance, you run this command immediately after your previous commit), then your snapshot will look exactly the same, and all you’ll change is your commit message.
As an example, if you commit and then realize you forgot to stage the changes in a file you wanted to add to this commit, you can do something like this:
1 | |
You end up with a single commit — the second commit replaces the results of the first.
Unstaging a Staged File
For example, let’s say you’ve changed two files and want to commit them as two separate changes, but you accidentally type git add * and stage them both. How can you unstage one of the two? The git status command reminds you:
1 | |
Right below the “Changes to be committed” text, it says use git reset HEAD <file>… to unstage. So, let’s use that advice to unstage the CONTRIBUTING.md file:
1 | |
The command is a bit strange, but it works. The CONTRIBUTING.md file is modified but once again unstaged.
Unmodifying a Modified File
What if you realize that you don’t want to keep your changes to the CONTRIBUTING.md file? How can you easily unmodify it — revert it back to what it looked like when you last committed (or initially cloned, or however you got it into your working directory)? Luckily, git status tells you how to do that, too. In the last example output, the unstaged area looks like this:
1 | |
It tells you pretty explicitly how to discard the changes you’ve made. Let’s do what it says:
1 | |
You can see that the changes have been reverted.
2.8 Working with Remotes
Showing Your Remotes
To see which remote servers you have configured, you can run the git remote command. It lists the shortnames of each remote handle you’ve specified.
1 | |
You can also specify -v, which shows you the URLs that Git has stored for the shortname to be used when reading and writing to that remote:
1 | |
Adding Remote Repositories
To add a new remote Git repository as a shortname you can reference easily, run git remote add <shortname> <url>:
1 | |
Fetching and Pulling from Your Remotes
1 | |
The command goes out to that remote project and pulls down all the data from that remote project that you don’t have yet. After you do this, you should have references to all the branches from that remote, which you can merge in or inspect at any time.
It’s important to note that the git fetch command only downloads the data to your local repository — it doesn’t automatically merge it with any of your work or modify what you’re currently working on. You have to merge it manually into your work when you’re ready.
Running git pull generally fetches data from the server you originally cloned from and automatically tries to merge it into the code you’re currently working on.
Pushing to Your Remotes
The command for this is simple: git push <remote> <branch>. If you want to push your master branch to your origin server, then you can run this to push any commits you’ve done back up to the server:
1 | |
This command works only if you cloned from a server to which you have write access and if nobody has pushed in the meantime. If you and someone else clone at the same time and they push upstream and then you push upstream, your push will rightly be rejected. You’ll have to fetch their work first and incorporate it into yours before you’ll be allowed to push.
Inspecting a Remote
If you want to see more information about a particular remote, you can use the git remote show <remote> command. If you run this command with a particular shortname, such as origin, you get something like this:
1 | |
It lists the URL for the remote repository as well as the tracking branch information. The command helpfully tells you that if you’re on the master branch and you run git pull, it will automatically merge the remote’s master branch into the local one after it has been fetched. It also lists all the remote references it has pulled down.
Renaming and Removing Remotes
You can run git remote rename to change a remote’s shortname. For instance, if you want to rename pb to paul, you can do so with git remote rename:
1 | |
It’s worth mentioning that this changes all your remote-tracking branch names, too. What used to be referenced at pb/master is now at paul/master.
If you want to remove a remote for some reason — you’ve moved the server or are no longer using a particular mirror, or perhaps a contributor isn’t contributing anymore — you can either use git remote remove or git remote rm:
1 | |
Once you delete the reference to a remote this way, all remote-tracking branches and configuration settings associated with that remote are also deleted.
2.9 Tagging
Typically, people use this functionality to mark release points (v1.0, v2.0 and so on).
Listing Your Tags
Listing the existing tags in Git is straightforward. Just type git tag (with optional -l or --list):
1 | |
This command lists the tags in alphabetical order; the order in which they are displayed has no real importance.
You can also search for tags that match a particular pattern. The Git source repo, for instance, contains more than 500 tags. If you’re interested only in looking at the 1.8.5 series, you can run this:
1 | |
Creating Tags
Git supports two types of tags: lightweight and annotated.
A lightweight tag is very much like a branch that doesn’t change — it’s just a pointer to a specific commit.
Annotated tags, however, are stored as full objects in the Git database. They’re checksummed; contain the tagger name, email, and date; have a tagging message; and can be signed and verified with GNU Privacy Guard (GPG). It’s generally recommended that you create annotated tags so you can have all this information; but if you want a temporary tag or for some reason don’t want to keep the other information, lightweight tags are available too.
Annotated Tags
Creating an annotated tag in Git is simple. The easiest way is to specify -a when you run the tag command:
1 | |
The -m specifies a tagging message, which is stored with the tag. If you don’t specify a message for an annotated tag, Git launches your editor so you can type it in.
You can see the tag data along with the commit that was tagged by using the git show command:
1 | |
That shows the tagger information, the date the commit was tagged, and the annotation message before showing the commit information.
Lightweight Tags
Another way to tag commits is with a lightweight tag. This is basically the commit checksum stored in a file — no other information is kept. To create a lightweight tag, don’t supply any of the -a, -s, or -m options, just provide a tag name:
1 | |
This time, if you run git show on the tag, you don’t see the extra tag information. The command just shows the commit:
1 | |
Tagging Later
You can also tag commits after you’ve moved past them. Suppose your commit history looks like this:
1 | |
Now, suppose you forgot to tag the project at v1.2, which was at the “Update rakefile” commit. You can add it after the fact. To tag that commit, you specify the commit checksum (or part of it) at the end of the command:
1 | |
You can see that you’ve tagged the commit:
1 | |
Sharing Tags
**By default, the git push command doesn’t transfer tags to remote servers. **You will have to explicitly push tags to a shared server after you have created them. This process is just like sharing remote branches — you can run git push origin <tagname>.
1 | |
If you have a lot of tags that you want to push up at once, you can also use the --tags option to the git push command. This will transfer all of your tags to the remote server that are not already there.
1 | |
Now, when someone else clones or pulls from your repository, they will get all your tags as well.
Note:
git pushpushes both types of tags
git push <remote> --tagswill push both lightweight and annotated tags. There is currently no option to push only lightweight tags, but if you usegit push <remote> --follow-tagsonly annotated tags will be pushed to the remote.
Deleting Tags
To delete a tag on your local repository, you can use git tag -d <tagname>. For example, we could remove our lightweight tag above as follows:
1 | |
**Note that this does not remove the tag from any remote servers. **There are two common variations for deleting a tag from a remote server.
The first variation is git push <remote> :refs/tags/<tagname>:
1 | |
The way to interpret the above is to read it as the null value before the colon is being pushed to the remote tag name, effectively deleting it.
The second (and more intuitive) way to delete a remote tag is with:
1 | |
Checking out Tags
If you want to view the versions of files a tag is pointing to, you can do a git checkout of that tag, although this puts your repository in “detached HEAD” state, which has some ill side effects:
1 | |
**In “detached HEAD” state, if you make changes and then create a commit, the tag will stay the same, but your new commit won’t belong to any branch and will be unreachable, except by the exact commit hash. **Thus, if you need to make changes — say you’re fixing a bug on an older version, for instance — you will generally want to create a branch:
1 | |
If you do this and make a commit, your version2 branch will be slightly different than your v2.0.0 tag since it will move forward with your new changes, so do be careful.
2.10 Git Aliases
Before we move on to the next chapter, we want to introduce a feature that can make your Git experience simpler, easier, and more familiar: aliases. For clarity’s sake, we won’t be using them anywhere else in this book, but if you go on to use Git with any regularity, aliases are something you should know about.
Git doesn’t automatically infer your command if you type it in partially. If you don’t want to type the entire text of each of the Git commands, you can easily set up an alias for each command using git config. Here are a couple of examples you may want to set up:
1 | |
This means that, for example, instead of typing git commit, you just need to type git ci. As you go on using Git, you’ll probably use other commands frequently as well; don’t hesitate to create new aliases.
This technique can also be very useful in creating commands that you think should exist. For example, to correct the usability problem you encountered with unstaging a file, you can add your own unstage alias to Git:
1 | |
This makes the following two commands equivalent:
1 | |
This seems a bit clearer. It’s also common to add a last command, like this:
1 | |
This way, you can see the last commit easily:
1 | |
三、Git Branching
3.1 Branches in a Nutshell
When you make a commit, Git stores a commit object that contains a pointer to the snapshot of the content you staged. This object also contains the author’s name and email address, the message that you typed, and pointers to the commit or commits that directly came before this commit (its parent or parents): zero parents for the initial commit, one parent for a normal commit, and multiple parents for a commit that results from a merge of two or more branches.
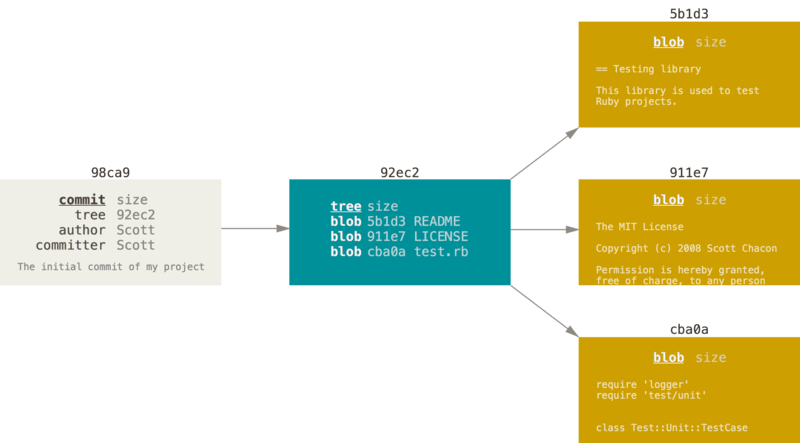
To visualize this, let’s assume that you have a directory containing three files, and you stage them all and commit. Staging the files computes a checksum for each one (the SHA-1 hash), stores that version of the file in the Git repository (Git refers to them as blobs), and adds that checksum to the staging area:
1 | |
When you create the commit by running git commit, Git checksums each subdirectory (in this case, just the root project directory) and stores them as a tree object in the Git repository. Git then creates a commit object that has the metadata and a pointer to the root project tree so it can re-create that snapshot when needed.
Your Git repository now contains five objects: three blobs (each representing the contents of one of the three files), one tree that lists the contents of the directory and specifies which file names are stored as which blobs, and one commit with the pointer to that root tree and all the commit metadata.
If you make some changes and commit again, the next commit stores a pointer to the commit that came immediately before it.
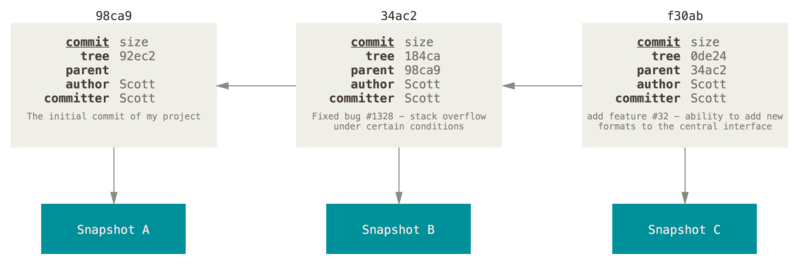
A branch in Git is simply a lightweight movable pointer to one of these commits. The default branch name in Git is master. As you start making commits, you’re given a master branch that points to the last commit you made. Every time you commit, the master branch pointer moves forward automatically.
The “master” branch in Git is not a special branch. It is exactly like any other branch. The only reason nearly every repository has one is that the
git initcommand creates it by default and most people don’t bother to change it.

Git keeps a special pointer called
HEAD. In Git, this is a pointer to the local branch you’re currently on.
3.2 Creating a New Branch
Let’s say you want to create a new branch called testing. You do this with the git branch command:
1 | |
This creates a new pointer to the same commit you’re currently on. In this case, you’re still on master. The git branch command only created a new branch — it didn’t switch to that branch.
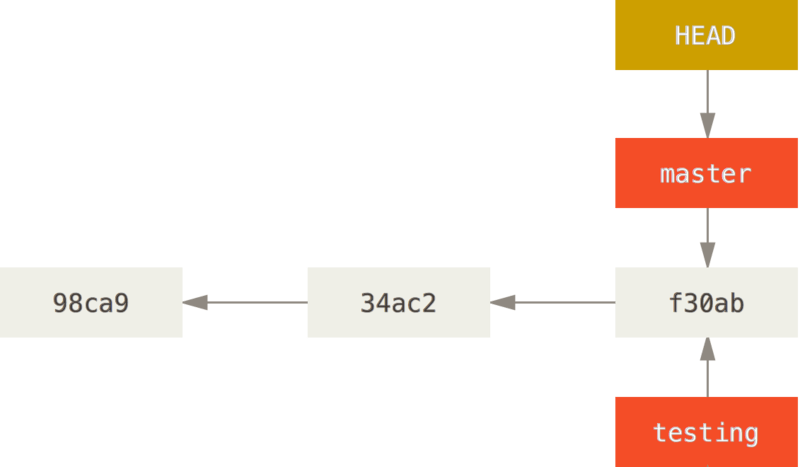
You can easily see this by running a simple git log command that shows you where the branch pointers are pointing. This option is called --decorate.
1 | |
You can see the master and testing branches that are right there next to the f30ab commit.
Creating a new branch and switching to it at the same time
It’s typical to create a new branch and want to switch to that new branch at the same time — this can be done in one operation with
git checkout -b <newbranchname>.
From Git version 2.23 onwards you can use
git switchinstead ofgit checkoutto:
- Switch to an existing branch:
git switch testing-branch.- Create a new branch and switch to it:
git switch -c new-branch. The-cflag stands for create, you can also use the full flag:--create.- Return to your previously checked out branch:
git switch -.
3.3 Switching Branches
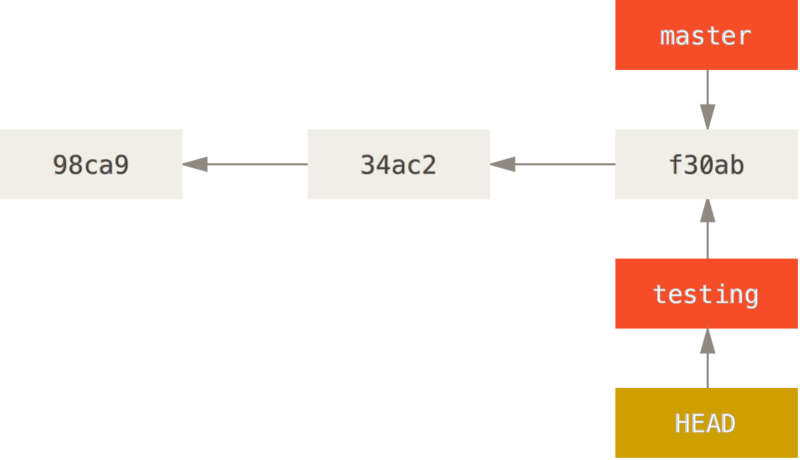
Let’s switch to the new testing branch:
1 | |
This moves HEAD to point to the testing branch.
Well, let’s do another commit:
1 | |

This is interesting, because now your testing branch has moved forward, but your master branch still points to the commit you were on when you ran git checkout to switch branches. Let’s switch back to the master branch:
1 | |
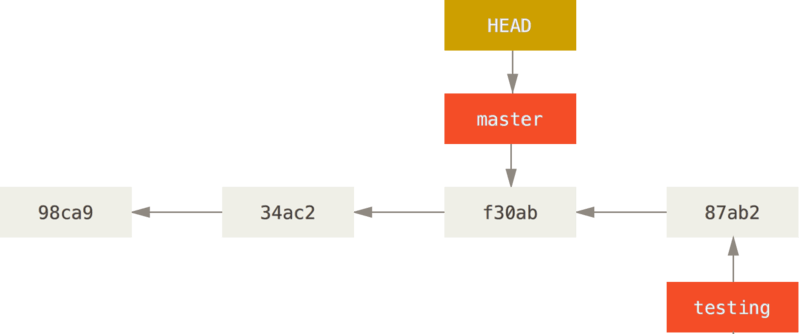
That command did two things. It moved the HEAD pointer back to point to the master branch, and it reverted the files in your working directory back to the snapshot that master points to. This also means the changes you make from this point forward will diverge from an older version of the project. It essentially rewinds the work you’ve done in your testing branch so you can go in a different direction.
Let’s make a few changes and commit again:
1 | |
Now your project history has diverged. You created and switched to a branch, did some work on it, and then switched back to your main branch and did other work. Both of those changes are isolated in separate branches: you can switch back and forth between the branches and merge them together when you’re ready.
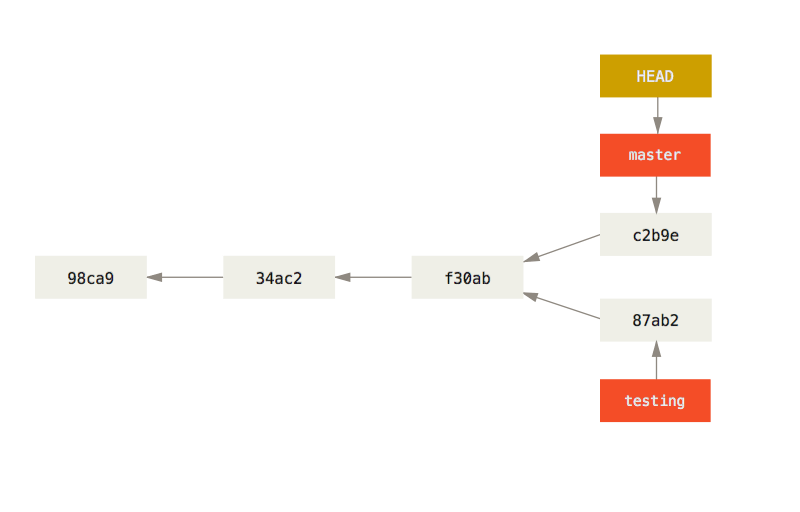
You can also see this easily with the git log command. If you run git log --oneline --decorate --graph --all it will print out the history of your commits, showing where your branch pointers are and how your history has diverged.
1 | |
3.5 Basic Branching and Merging
[Basic Branching and Merging](Git - Basic Branching and Merging (git-scm.com))
3.6 Branch Management
The git branch command does more than just create and delete branches. If you run it with no arguments, you get a simple listing of your current branches:
1 | |
Notice the
*character that prefixes themasterbranch: it indicates the branch that you currently have checked out (i.e., the branch thatHEADpoints to). This means that if you commit at this point, themasterbranch will be moved forward with your new work.
To see the last commit on each branch, you can run git branch -v:
1 | |
The useful --merged and --no-merged options can filter this list to branches that you have or have not yet merged into the branch you’re currently on. To see which branches are already merged into the branch you’re on, you can run git branch --merged:
1 | |
Because you already merged in iss53 earlier, you see it in your list. Branches on this list without the * in front of them are generally fine to delete with git branch -d; you’ve already incorporated their work into another branch, so you’re not going to lose anything.
To see all the branches that contain work you haven’t yet merged in, you can run git branch --no-merged:
1 | |
This shows your other branch. Because it contains work that isn’t merged in yet, trying to delete it with git branch -d will fail:
1 | |
If you really do want to delete the branch and lose that work, you can force it with
-D, as the helpful message points out.
Changing a branch name
Suppose you have a branch that is called bad-branch-name and you want to change it to corrected-branch-name, while keeping all history. You also want to change the branch name on the remote (GitHub, GitLab, other server).
Rename the branch locally with the git branch --move command:
1 | |
This replaces your bad-branch-name with corrected-branch-name, but this change is only local for now. To let others see the corrected branch on the remote, push it:
1 | |
Now we’ll take a brief look at where we are now:
1 | |
Notice that you’re on the branch corrected-branch-name and it’s available on the remote. However, the branch with the bad name is also still present there but you can delete it by executing the following command:
1 | |
Now the bad branch name is fully replaced with the corrected branch name.
Do not rename branches that are still in use by other collaborators.
Changing the master branch name
Warning: Changing the name of a branch like master/main/mainline/default will break the integrations, services, helper utilities and build/release scripts that your repository uses. Before you do this, make sure you consult with your collaborators. Also, make sure you do a thorough search through your repo and update any references to the old branch name in your code and scripts.
Rename your local master branch into main with the following command:
1 | |
There’s no local master branch anymore, because it’s renamed to the main branch.
To let others see the new main branch, you need to push it to the remote. This makes the renamed branch available on the remote.
1 | |
Now we end up with the following state:
1 | |
Now you have a few more tasks in front of you to complete the transition:
- Any projects that depend on this one will need to update their code and/or configuration.
- Update any test-runner configuration files.
- Adjust build and release scripts.
- Redirect settings on your repo host for things like the repo’s default branch, merge rules, and other things that match branch names.
- Update references to the old branch in documentation.
- Close or merge any pull requests that target the old branch.
After you’ve done all these tasks, and are certain the main branch performs just as the master branch, you can delete the master branch:
1 | |
3.7 Remote Branches
[Remote Branches](Git - Remote Branches (git-scm.com))
Tracking Branches
Checking out a local branch from a remote-tracking branch automatically creates what is called a “tracking branch” (and the branch it tracks is called an “upstream branch”). Tracking branches are local branches that have a direct relationship to a remote branch. If you’re on a tracking branch and type git pull, Git automatically knows which server to fetch from and which branch to merge in.
When you clone a repository, it generally automatically creates a master branch that tracks origin/master. However, you can set up other tracking branches if you wish — ones that track branches on other remotes, or don’t track the master branch. The simple case is the example you just saw, running git checkout -b <branch> <remote>/<branch>. This is a common enough operation that Git provides the --track shorthand:
1 | |
In fact, this is so common that there’s even a shortcut for that shortcut. If the branch name you’re trying to checkout (a) doesn’t exist and (b) exactly matches a name on only one remote, Git will create a tracking branch for you:
1 | |
If you already have a local branch and want to set it to a remote branch you just pulled down, or want to change the upstream branch you’re tracking, you can use the -u or --set-upstream-to option to git branch to explicitly set it at any time.
1 | |
If you want to see what tracking branches you have set up, you can use the -vv option to git branch. This will list out your local branches with more information including what each branch is tracking and if your local branch is ahead, behind or both.
1 | |
branch is X commits behind means that there are X new (unmerged) commits on the branch which is being tracked by your current branch.
branch is X commits ahead analogously means that your branch has X new commits, which haven’t been merged into the tracked branch yet.
Once you’ve pulled (thereby merging the remote changes into your local ones) and pushed (thereby publishing your changes and the merge to the remote), your own branch and the remote branch will point to the same commit, so neither is ahead or behind.